Peach Rosemary Gluten-Free Scones

It’s stone fruit season! I’ve been going to the farmers market every week to pick up a batch of peaches, nectarines, apricots, cherries – whatever is looking the best. Stone fruits are one of those things that are just never as good at the grocery store.
I’m (im)patiently waiting on our fruit trees. We’re on year two and it looks like our nectaplum tree will have a nice batch of fruit this year, everything is still giving us one or two – and we’ve got to get to it before the squirrels.

I am applying for a recipe developer job with Minimalist Baker and to get in the mood for the video I needed to submit, I found one of her recipes to tweak. I modified her Blueberry Gluten-free scones to make some with peaches. During this past year I’ve learned that I do feel better eating gluten and dairy free, so have been looking to learn more about baking this way, and Minimalist Baker has a lot of good recipes to get started with this type of cooking. I’m slowly branching out from the gluten-free all purpose flour mix I have to play around with different flours and starches to get the texture I’m looking for.

Peach Rosemary Gluten-free Scones

  • Servings: 8
  • Difficulty: Medium
  • Print

Ingredients:

  • 1/2 Tbsp chia seeds
  • 1 1/4 Tbsp water
  • 1/3 c plain almond milk
  • 1/2 c oat flour
  • 2 1/2 tsp baking powder
  • 3/4 c + 1 Tbsp potato starch
  • 2 1/2 Tbsp sugar
  • 1/4 tsp salt
  • 3 Tbsp chopped rosemary
  • 3 Tbsp coconut oil (solid)
  • 1/4 c diced peaches

Preheat oven to 400 degrees.

In a small bowl mix chia seeds and water, let sit at least 5 minutes. Add almond milk and mix.

In a large bowl mix almond flour, oat flour, baking powder, potato starch, sugar, salt and rosemary until well combined. Chop in the coconut oil with a pastry cutter or a fork until the mixture looks crumbly and sandy. Mix the almond milk and chia seed mixture once more and add to the dry ingredients until gently incorporated without over mixing. Add diced peaches and mix gently until combined.

Turn out the dough on a lightly floured surface. (You can use almond flour here). Pat the dough into a disk and roll it out about 1 inch thick. Cut the disk into 8 wedges and transfer to a baking sheet with a silpat or parchment paper.

Bake in heated oven for 18-22 minutes. 22 was preferred in my oven to get nice and golden on top.

These were delicious and did not taste gluten or dairy free. In fact, they felt quite buttery and were perfect with a warm cup of coffee. Nice and flaky, they toasted up pretty well on day 2 and 3.

1 Comment

Filed under baking, Uncategorized

Marinated zucchini salad

You can find an earlier version of this recipe here from back when I first started this blog. I thought about just updating that post but didn’t want to wipe out the memory of our early garden completely.  This year we’re in a new house and our garden isn’t quite ready to give us tasty zucchini. However this no cook meal was just right to celebrate the first day of summer.

Marinated Zucchini Salad

  • 1 zucchini, sliced thinly
  • Olive oil
  • Salt
  • Pepper
  • Lemon juice
  • Fresh, crumbly cheese of your choice
  • Fresh herbs
  • Optional prosciutto or pine nuts

Layer thin slices of zucchini with salt, pepper, olive oil, and lemon juice. It’s key to let the salad sit for about an hour before eating to let the lemon juice tenderize the zucchini so that it doesn’t taste raw.

Experiment with your favorite crumbly cheese and fresh herbs. Today’s version featured fresh cotija cheese and basil. I’ve made this before with feta, ricotta salata, and goat cheese.  If you want to make a heartier salad, proscuitto and toasted pine nuts are a great addition. I’d love to hear about your favorites.


1 Comment

Filed under Dinner, Garden, Quick Healthy, Salad, Vegetable

Pan Seared Oven Roasted Steak

IMG_6044
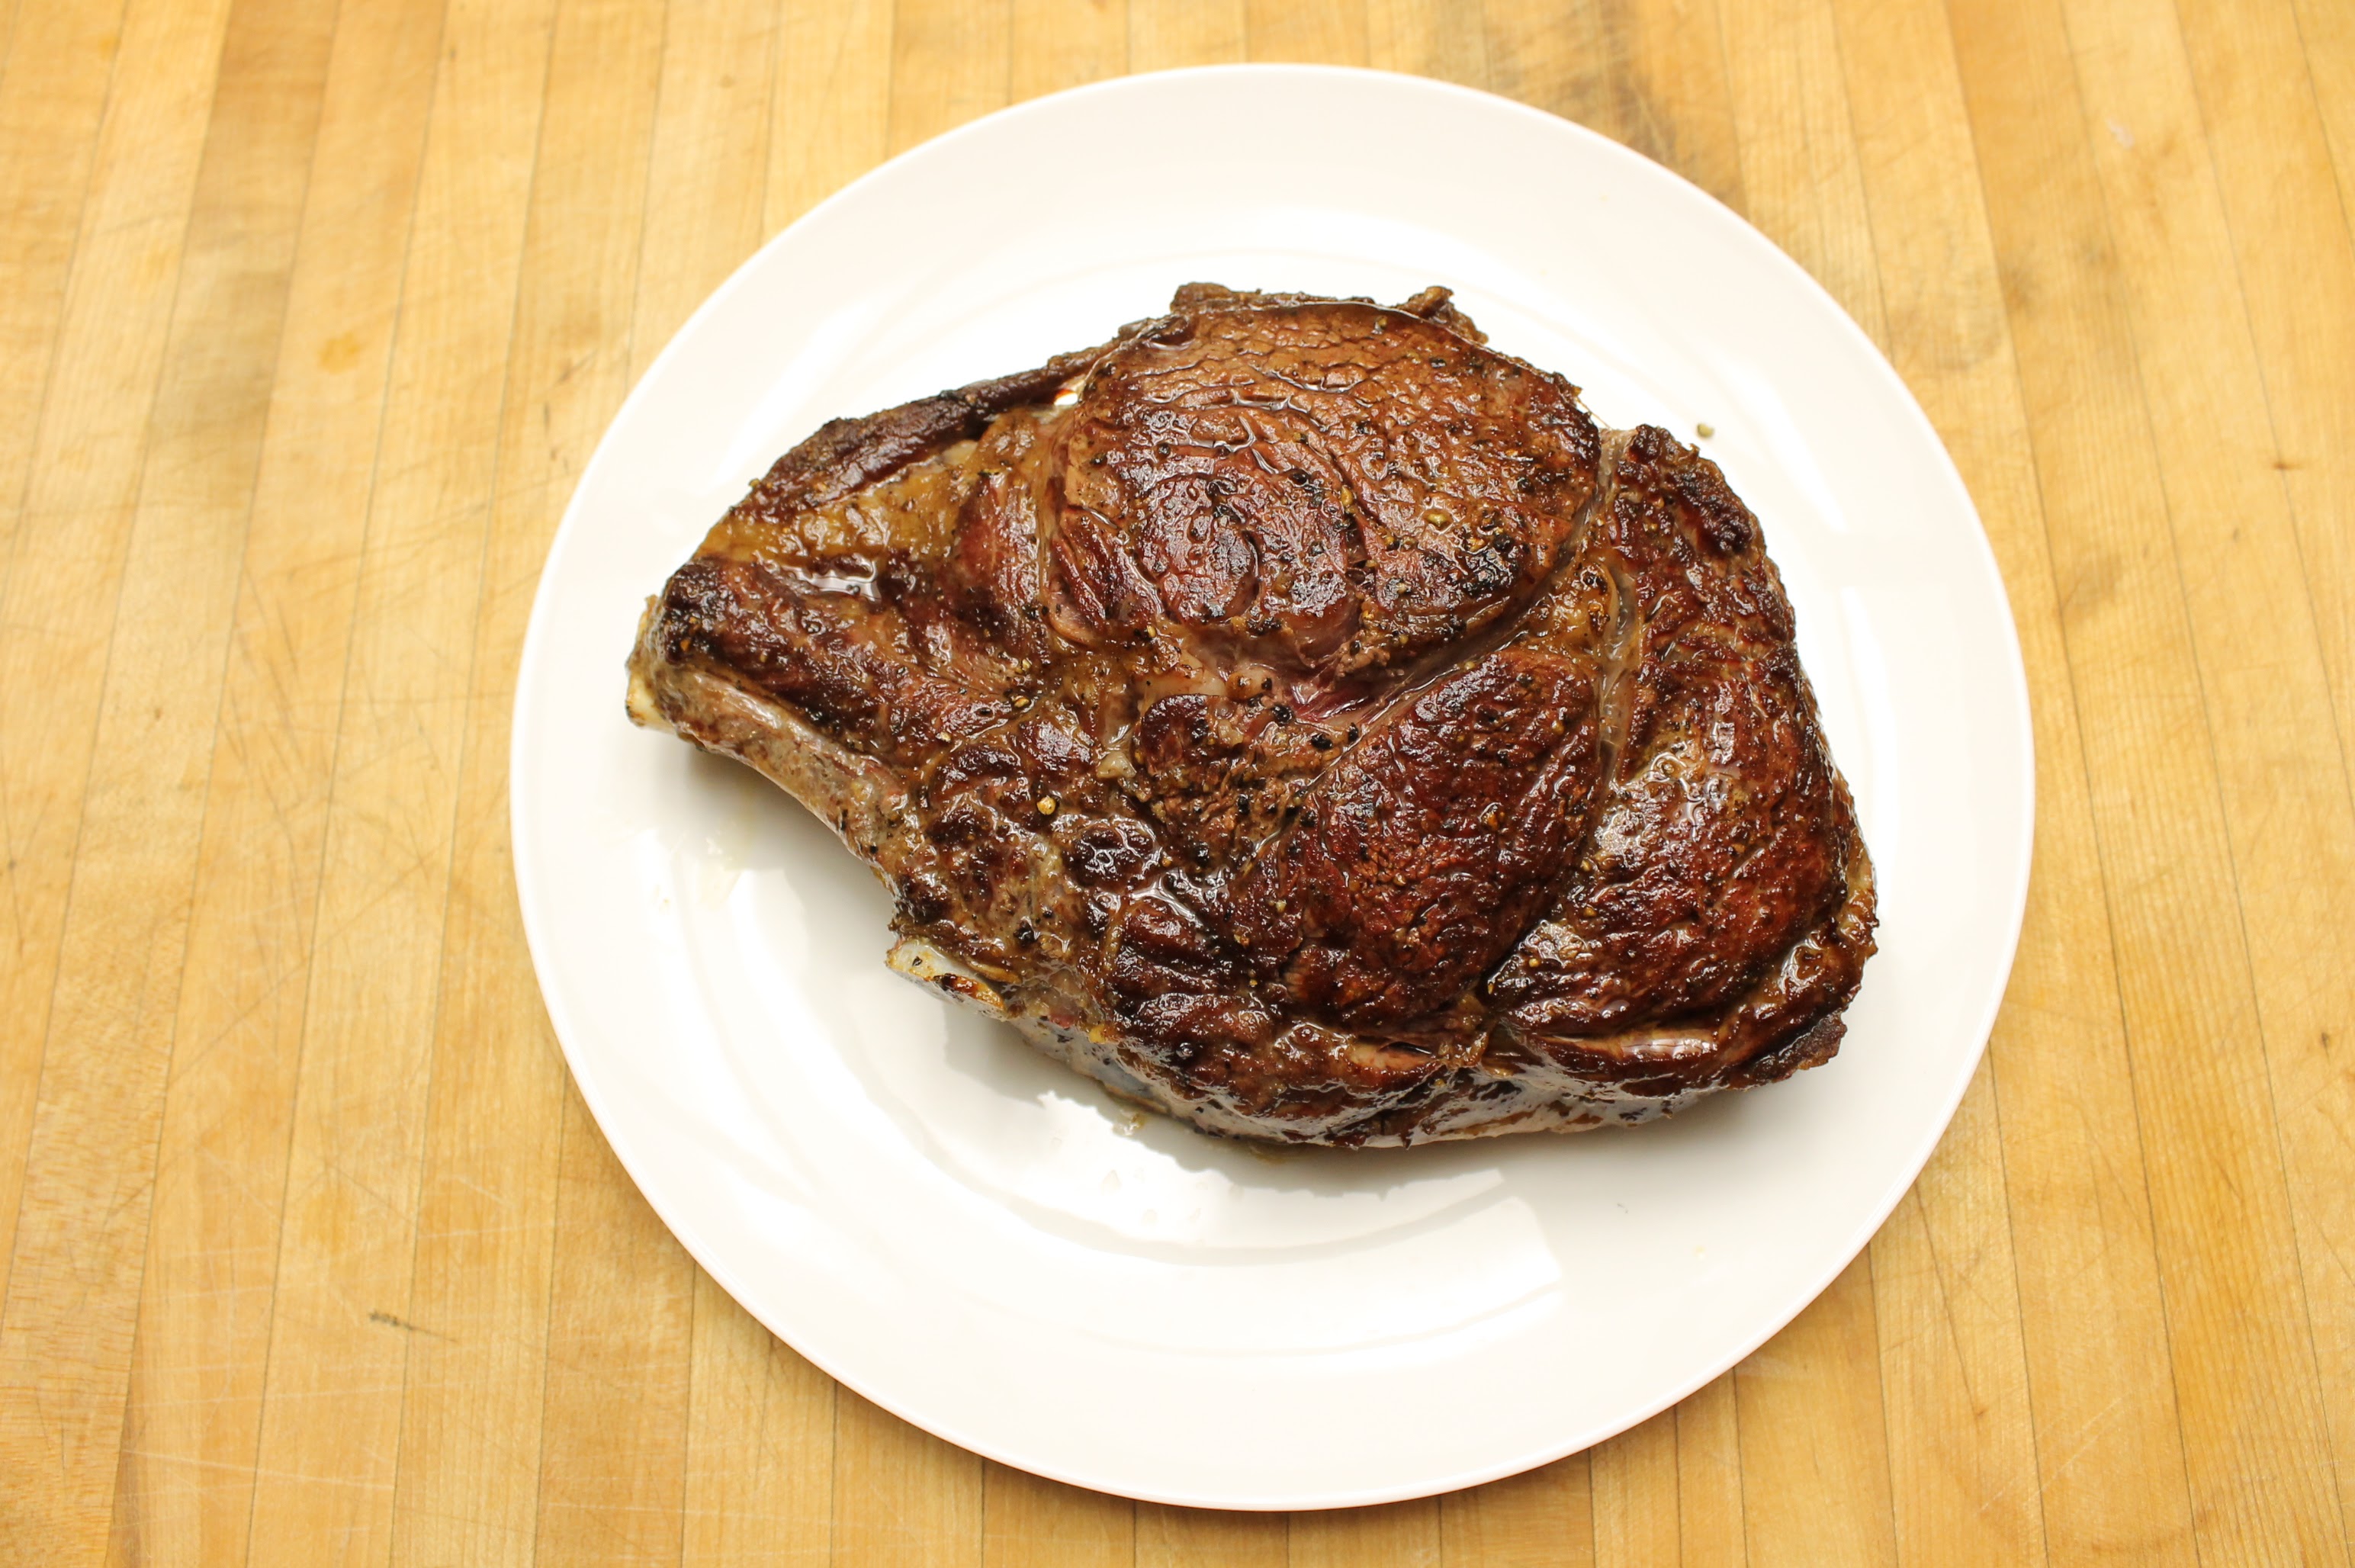
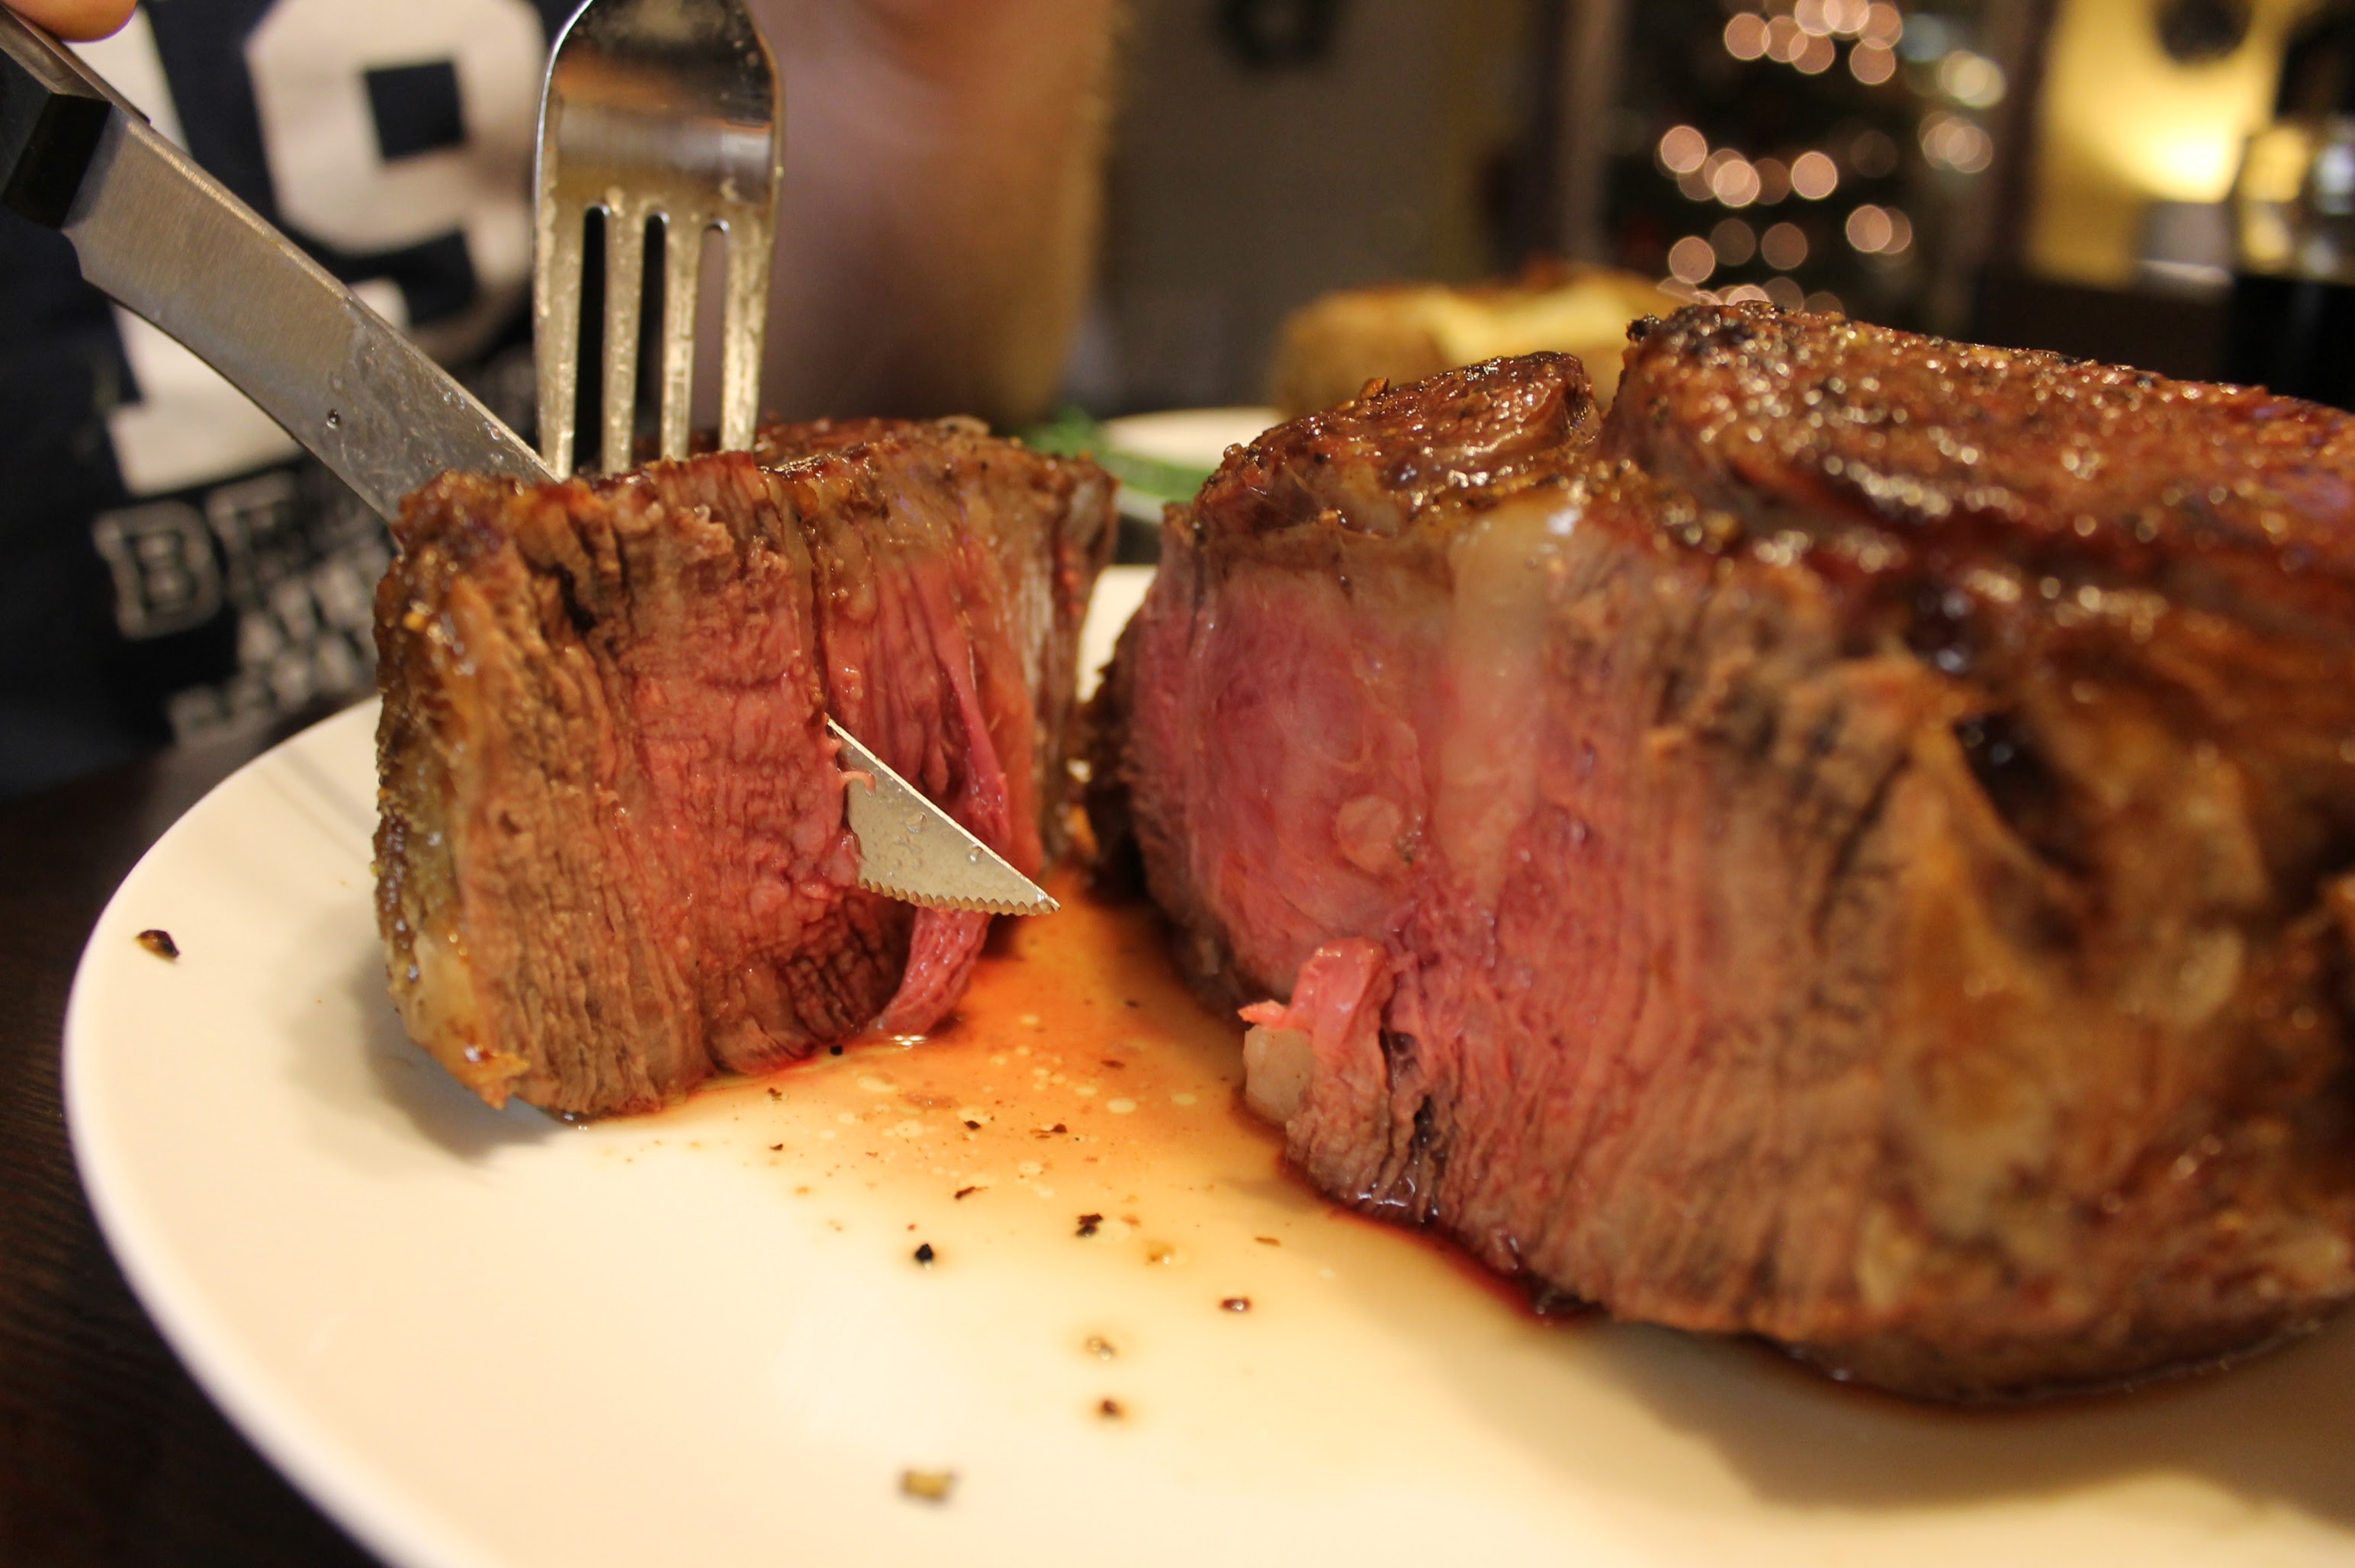
Most years for special occasions like New Year’s Eve, Valentine’s Day, and birthdays hubby and I splurge on getting a really good steak from an actual butcher shop like Siesel’s or Iowa Meat Farms. Our favorite is to get a Delmonico Rib Eye, which still has the bone in, and is available in a double thick cut. One really giant steak to cook to a perfect medium rare, and share between the two of us. It feels fancy, it’s cheaper than going out to a steak house on a crowded night, and we have a lot of fun cooking together.
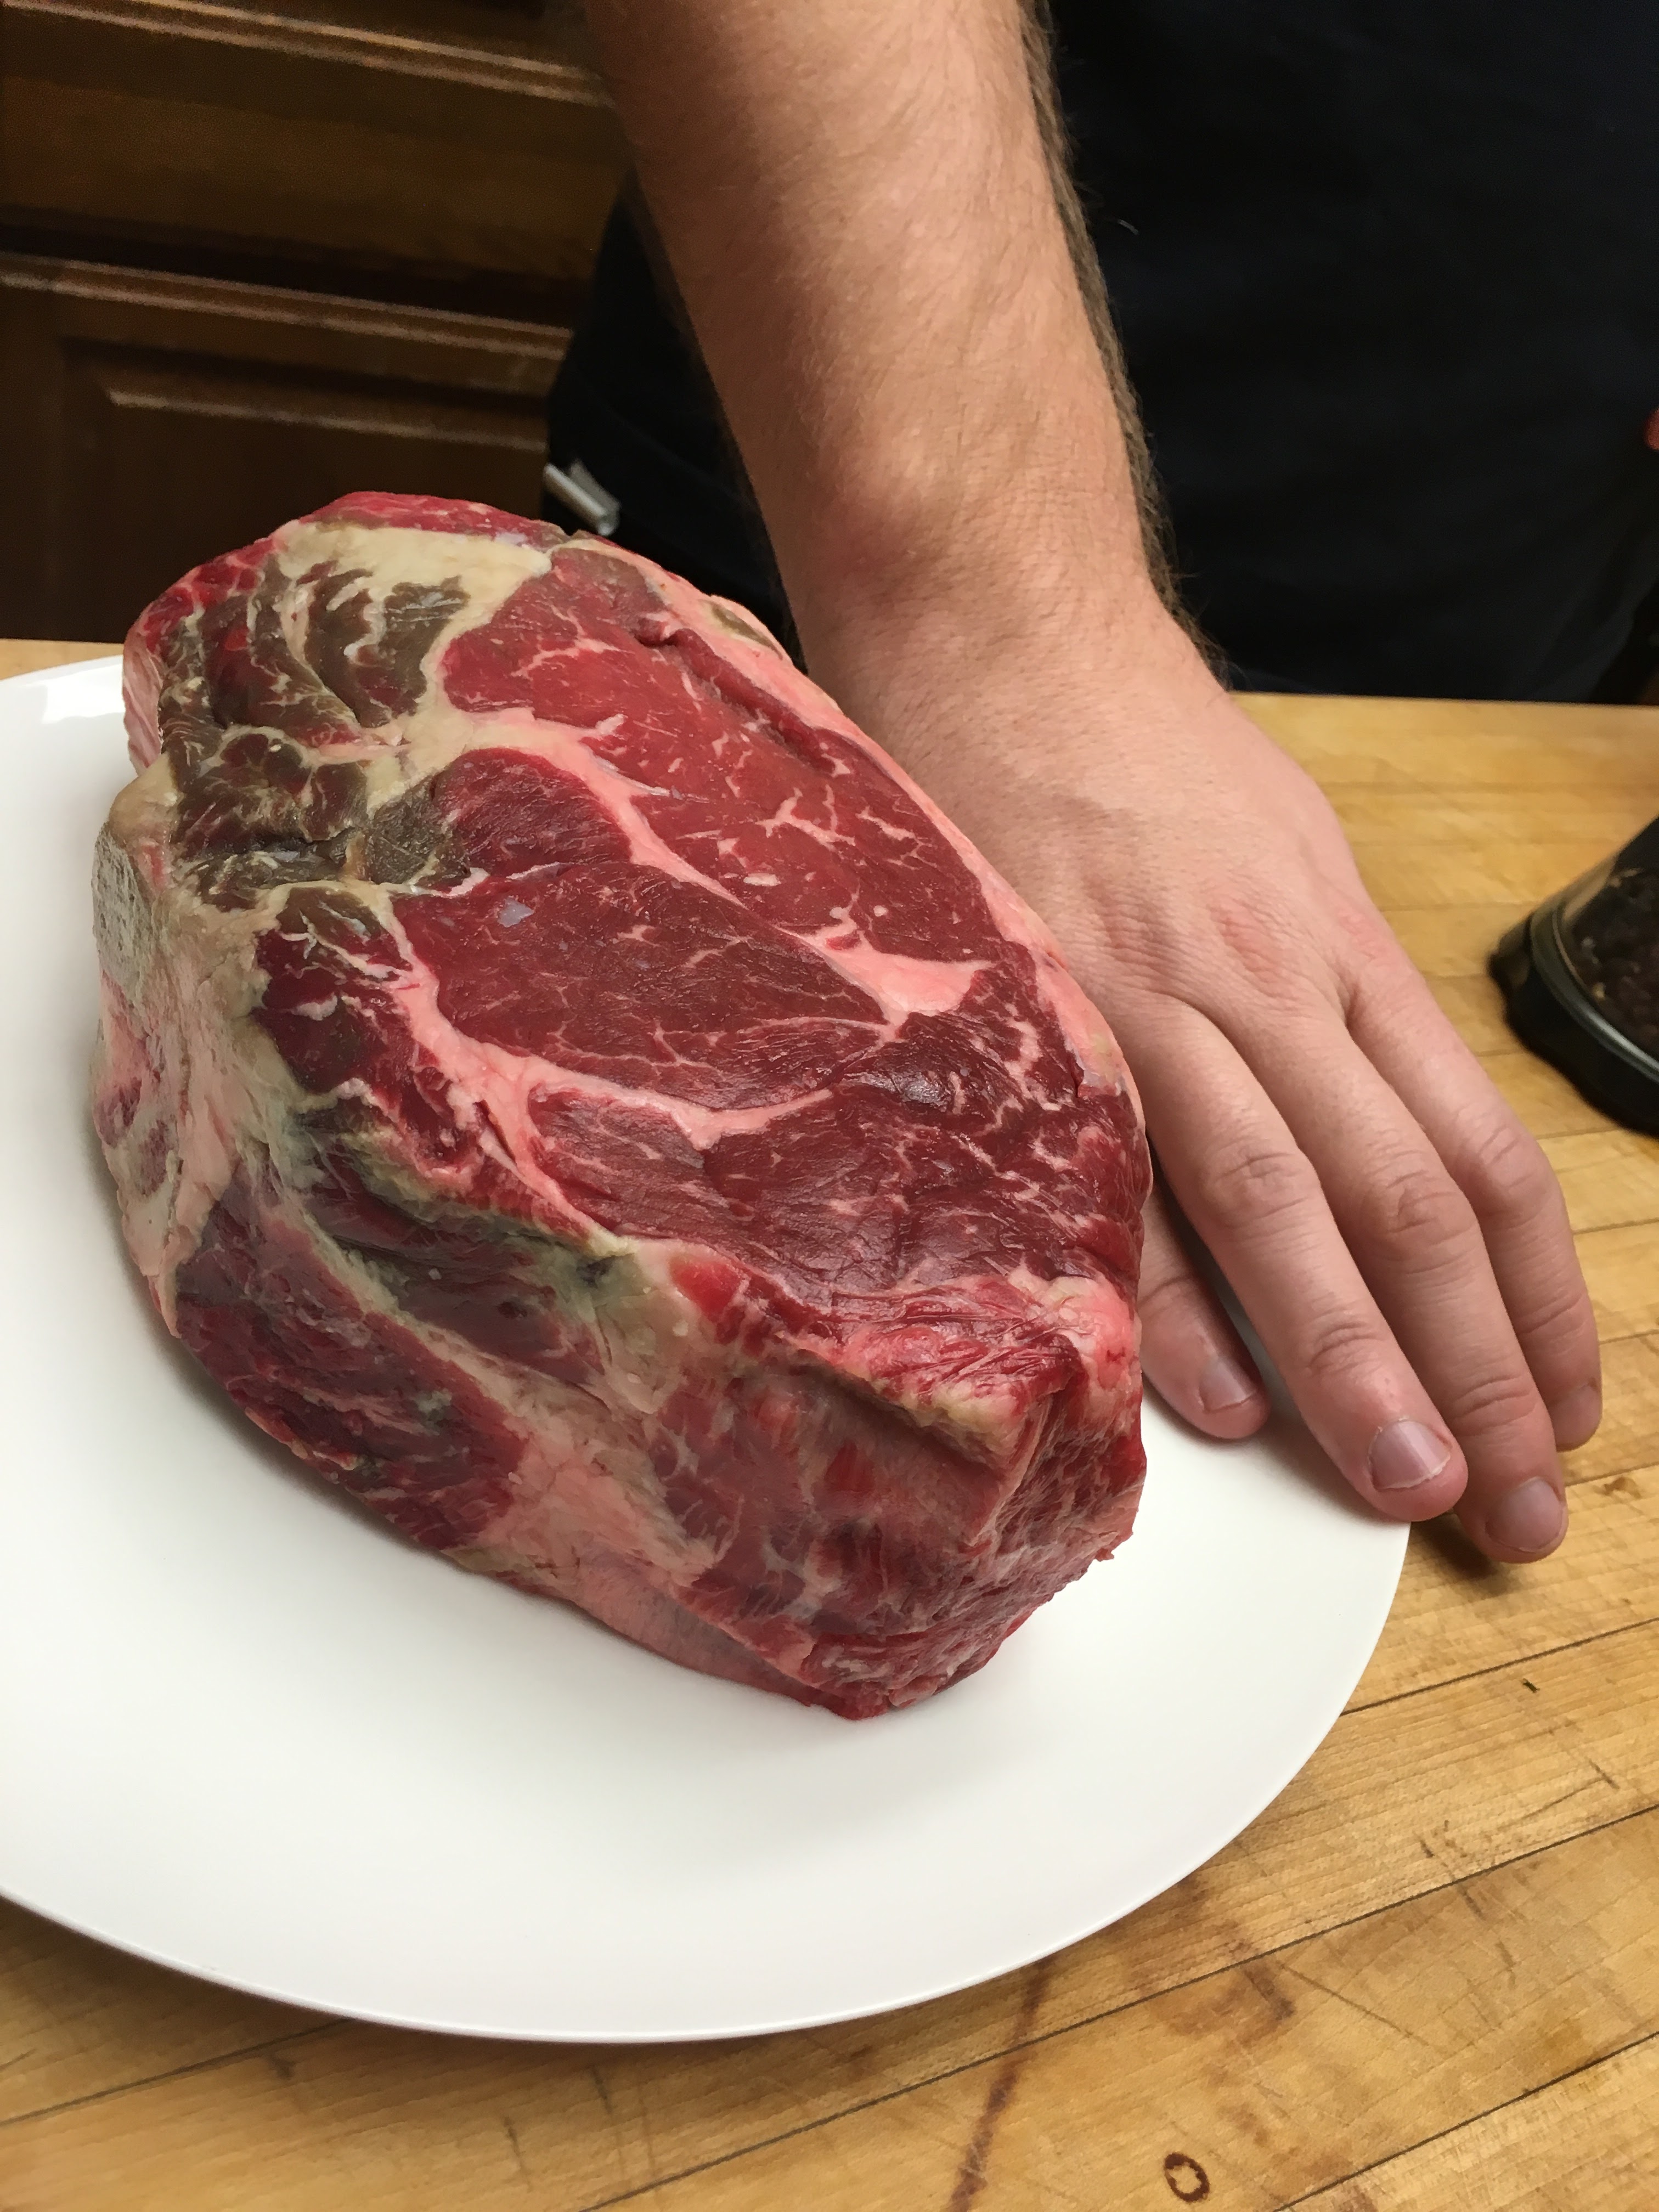
 IMG_0081

I think we have finally perfected our method for cooking an amazing steak with a crunchy seared exterior, and perfectly tender interior.

IMG_6040

Pan Seared Oven Roasted Steak

  • Servings: 2 (with left overs for steak and eggs)
  • Difficulty: Medium
  • Print

Ingredients:

  • The best steak you can get your hands on
  • Olive oil
  • A well seasoned cast-iron skillet
  • Salt and Pepper

Take your steak out of the fridge at least a half hour before cooking to bring to room temperature. Rub with olive oil, and generously season the steak on all sides with salt and pepper.

Preheat your oven to 500 degrees F.

Heat a well-seasoned cast iron skillet over high heat. Sear your steak on all sides. You may need to hold it upright with tongs to brown the edges. For our double thick steak, we seared it for about 45 seconds per side.

Once the steak is browned on all sides, slide it in the cast iron skillet into your oven. Cook the steak for 2-7 minutes on each side, depending on thickness. (2 minutes per side for a medium rare 1 1/2 inch steak, 7 minutes per side for a 3 inch thick steak)

Let steak rest for about ten minutes before slicing it.


Leave a comment

Filed under Cooking Project, Dinner, Recipes

When life gets in the way…

I haven’t posted in over a month and I miss it!

I just wanted to say that I haven’t gone away, and intend to return to this blog shortly with weekly posts.

The past two months have been a little crazy because…we bought a house! A cute, old Spanish-style bungalow in the same neighborhood we’ve been renting in for the past six years. Old being the key word…the house is a bit of a fixer-upper so all of my free time in the past few weeks has been dedicated to patching plaster walls, sanding kitchen cabinets, etc. Not to mention it’s the busiest time of year at my relatively new job.

So, just wanted to reach out and let you know I will be back! I’ll be sharing some pictures of our kitchen renovation. I am sad to be losing my butcher block island which has starred in so many of the photos on this blog, but I think what we’ve got planned will be fun. I can’t wait to experiment with the lighting options in the new kitchen.

What have we been eating during this time? There’s been a few rounds of delivered pizza and burritos from the corner taco shop, and actually a lot of dinners out with both of our families. And food that I’m just not interested in sharing. Oh and cleaning out the freezer/pantry. This works two-fold in saving some money and having less food to move into the new house.

But I know for a lot of you out there, what to eat during the busy times is what you’re looking for to be inspired! So here’s a brief summary of what’s been cooked lately:

  • A few thai currys – no real recipe, usually shrimp, chopped up veggies, 2 tsp of curry paste and 1/2 can of coconut milk
  • Grilled chicken or fish and grilled vegetables – usually only seasoned with olive oil, salt and pepper.
  • One delicious riff on a caprese salad with nectarines
  • Fajitas – which enabled us to eat quesadillas for dinner and fajita salads for lunch all week – an easy win!
  • Sheet pan dinners consisting of a protein and whatever veggies are lying around, salt, pepper, olive oil, a 400 degree oven and you’re good to go

I hope to be settled into my new kitchen soon with more to share. I hope your summers were great and you’ve been eating well.

Until next time!

Leave a comment

Filed under Uncategorized

Stuffed tomatoes

IMG_2617

I love this time of year. It’s usually when our backyard garden is at it’s peak, and my menu planning is guided by a Sunday afternoon harvest. We had a late and rocky start to planting this year due to some unexpected SDGE projects in our yard, and I was worried that we wouldn’t have the success we’ve had in previous summers. Thankfully we’ve got a very powerful “volunteer” tomato that sprouted and has completely taken over a corner. It’s been giving us a handful of tomatoes every week, and this week we got an abundance!

I saw a video online recently for stuffed tomatoes, and was reminded of making stuffed tomatoes in a cooking class in Italy during my study abroad program in 2005. Unfortunately I couldn’t get my hands on that recipe, but between perusing The Silver Spoon and a few online recipes, here’s what we landed on: Plump hollowed out tomatoes stuffed with zucchini, rice, tomatoes and herbs, surrounded by diced tomatoes.

IMG_2633

Stuffed Tomatoes

  • Servings: 4
  • Difficulty: Medium
  • Print

7 tomatoes
1/2 yellow onionIMG_2635 3 garlic cloves
1 zucchini
1/4 cup cooked rice
1/2 lemon
2 small yukon gold potatoes
olive oil
salt and pepper
parmesan cheese optional for finishing
an abundance of italian herbs. I used rosemary, oregano, thyme and basil

Preheat the oven to 400 degrees.

Slice the tops off of the tomatoes and reserve. Using a spoon, hollow out the inside of the tomato, and scoop the flesh into a bowl. If desired, turn the tomatoes upside down and let them drain. I’m not entirely sure of the benefits of this, but I do feel like the sides of my tomatoes held up a bit better. Pulse onion, garlic, 1 tsp olive oil and a pinch salt in a food processor or blender, and dump into a large bowl. Separate tomato flesh chunks from the juice and pulse in the food processor, add to large bowl. Shred zucchini in food processor or with a grater, and add to large bowl. Add rice, lemon juice, a generous pinch of salt, pepper, and chopped herbs to everything in the large bowl. Place the tomatoes into an oiled baking dish. Using a fork to slightly drain the mixture, stuff the hollowed out tomatoes with the zucchini rice mixture.

Dice up the potatoes and toss with salt, pepper, olive oil and herbs. Stuff potatoes all around tomatoes. Pour the remaining tomato juice and any juices from the stuffing mixture over the potatoes.

Bake at 400 degrees for 20 minutes, turn the heat down to 385 degrees and bake for an additional 20 minutes. If desired, finish with a sprinkling of Parmesan cheese before the last 5 minutes of baking.

Serve with a small green salad and some crusty bread, and a nice glass of red wine. Bon appetit!

2 Comments

Filed under cooking, Cooking Project, Dinner, Recipes

Pistachio Ice Cream

image

As we prepare for a hot summer, we are stockpiling our freezer with different flavors of home made ice cream. We received a great ice cream cookbook, Jeni’s Splendid Ice Creams at Home, as a wedding present from some friends who took us to a Jeni’s in Chicago. Since we don’t have one in San Diego, it’s time to make our own.

IMG_2318

First up, some toasted pistachio ice cream. So rich and nutty, a little bit salty, a little bit tangy from the cream cheese. Most of Jeni’s recipes have a cream cheese base instead of an egg custard base. I can’t get enough.

IMG_2319

As with all homemade ice creams, make sure that your ice cream maker is frozen well in advance of when you want to make ice cream, at least 24 hours. Also, I like to plan to make my base the day before I churn it, to give the cream plenty of time to chill in the fridge.


This ice cream is delicious and very flavorful on its own, but is spectacular with additional toasted pistachios and shaved dark chocolate.

image

Toasted Pistachio Ice Cream

  • Servings: 4 as a side
  • Difficulty: Medium
  • Print

Recipe from Jeni’s Splendid Ice Creams at Home

INGREDIENTS
1/2 cup shelled unsalted pistachios (plus 1/4 cup if you want to add whole ones to your ice cream)
2 cups whole milk
1 tablespoon plus 1 teaspoon cornstarch
1 1/2 ounces (3Tbsp) cream cheese, softened
1/2 tsp fine sea salt
1 1/4 cups heavy cream
2/3 cup sugar
2 Tbsp light corn syrup
1/2 tsp almond extract

Directions:

Preheat the oven to 350 degrees. Spread the pistachios out on a small baking sheet and toast in the oven for 10-12 minutes, until fragrant and just starting to brown. Remove from the oven and pulverize 1/2 cup of pistachios in a food processor until the pistachios become a very smooth paste. Add the cream cheese and salt and blend until smooth.
Mix about 2 Tbsp of the milk with the cornstarch in a small bowl to make a smooth slurry and set aside.
Combine the remaining milk, cream, sugar, and corn syrup in a 4-quart saucepan, bring to a rolling boil over medium-high heat, and boil for 4 minutes. Remove from the heat and gradually whisk in the cornstarch slurry.
Bring the mixture back to a boil over medium-high heat, and cook, stirring , until slightly thickened, about 1 minute. Remove from heat.
Gradually whisk the hot milk mixture into the cream cheese mixture until smooth. Chill in an ice bath for 30 minutes, or preferably overnight in the fridge.
Pour the ice cream base into the frozen canister. Add the almond extract while churning. Follow the directions on your machine, churning until the ice cream is thick and creamy. Package, with or without additional pistachios, and freeze for at least 4 hours before serving.

Leave a comment

Filed under Cooking Project, Dessert, Recipes

Lemon Orange Poppyseed Muffins

IMG_2288

As I’ve mentioned before, Sunday mornings in our house are often for leisurely breakfasts, usually involving a baking project of some kind. This past weekend I really wanted to make some buttermilk muffins as a way to use up some of the buttermilk in my fridge.

IMG_2273

I found myself lacking all of things I usually put into muffins: blueberries (frozen or fresh), other berries, dried fruits, etc. It must be time to go shopping!

IMG_2277
What we did have is a nice supply of meyer lemons and oranges, and some poppyseeds from the spice cupboard. These muffins ended up being so deliciously fresh, with a nice tartness from the citrus and buttermilk. I’m sure I will make these again, more intentionally this time!

IMG_2290

These muffins ended up being a perfect vehicle for our Orange Vanilla Marmalade.

Lemon Orange Poppyseed Muffins

  • Servings: 12
  • Difficulty: Medium
  • Print

Recipe adapted from Sally’s Baking Addiction

INGREDIENTS

2 and 1/3 cups all-purpose flour
1/2 cup granulated sugar
1/4 cup packed light brown sugar
3 Tablespoons poppy seeds
2 teaspoons baking powder
1/4 teaspoon baking soda
1/2 teaspoon salt
1/2 cup salted butter, melted
juice and zest of 2 medium lemons
juice and zest of 1 orange
2 large eggs, at room temperature
1/2 cup buttermilk
1 teaspoon vanilla extract

Directions:

Preheat oven to 425°F. Spray 12-count muffin pan with nonstick spray. Set aside.
In a large bowl, whisk the flour, granulated sugar, brown sugar, poppy seeds, baking powder, baking soda, and salt together until thoroughly mixed. Set aside.
In a medium bowl, whisk the melted butter, lemon juice, lemon zest, orange juice, and orange zest together until combined. (Our citrus was very juicy, so we only used the juice of 1 lemon and 1/2 orange) Add the eggs, one at a time, whisking after each addition. Whisk in the buttermilk and vanilla. Pour the wet ingredients into the dry ingredients and gently mix together until no pockets of flour remain. Do not overmix. The batter is extremely thick.
Spoon the thick batter into the muffin tins, filling them all the way to the top, about 1/4 cup of batter in each. Bake for 5 minutes at 425°F. Keeping the muffins in the oven, reduce oven temperature to 375°F  and continue to bake for 10-13 minutes longer until tops are lightly golden. A toothpick inserted in the center should come out clean. Allow to cool for 10 minutes.

1 Comment

Filed under baking, Breakfast, Recipes

A Taste of Portland, OR

My husband and I recently spent a long weekend in Portland, Oregon. We went armed with a list of restaurants that friends said we just had to taste, and spent a lot of time walking the city from restaurant to restaurant.

Here’s a recap of some of our favorite eats and recommendations:

Fried Oyster and Bacon Omelet and Cinnamon French Toast at Cafe Bijou

imageSour Beers at Cascade Brewing. My favorite was a fig flavored one. They offer lots of tasters and flight options so you can get a feel for the different kind of sour beers.

Lots of whiskey drinks all over the city.

imageHush Puppies at The Waiting Room.

“Pig Candy,” Bruschetta with Burrata, and a Grilled Romaine Salad at The Fireside.

IMG_1448Ice Cream at Cool Moon

Obligatory stop at VooDoo Doughnuts (admittedly, not my favorite).

The Reggie Deluxe and the Chatfield at Pine State Biscuits. The Reggie Deluxe has a super flavorful sausage gravy over the whole thing but was a little rich for me. I enjoyed the Chatfield which paired sweet and savory with cheddar cheese, fried chicken, bacon, and apple butter on a biscuit.

We were encouraged to go to the Whiskey Soda Lounge instead of the crowded Pok Pok where we could still try the wings that they are known for. We also had an amazing Tamarind Whiskey Sour (which we have occasionally made at home), Roasted Cashews with Green Onions and Chiles, a Crispy Pigs Ear appetizer, and their famous Ike’s Vietnamese Fish Sauce Wings.  All delicious.

IMG_1645More whiskey cocktails at the Richmond. The Richmond was my favorite bar that we visited. Located in the Division district, it had a fun, laid back vibe and slightly retro decor.

IMG_1655Ice Cream at Salt and Straw: I got the rhubarb crumble and salted carmel, very good ice cream but this place is usually packed and I thought our ice cream at Cool Moon was just as good.

IMG_1697Ramen at Mirakutei

IMG_1571And, to try to burn off some of these indulgent calories, we enjoyed a tough hike to the top of Multnohmah Falls.

Until next time Portland, you were great!

Leave a comment

Filed under Review, Travel

Fava beans

IMG_2049Fava beans are in season! I don’t know why I love these so much as they are a bit of a pain to deal with. But the end result is so worth it. So fresh and creamy, tastes just like spring should.

We have tried to grow fava beans in our garden, but have only had one successful season. This year we have ONE bean pod growing so far…image

Thankfully these were in my CSA box this past week.

IMG_2051First you peel off the tough outer pods, and get big beans inside. Boil these for about 7-10 minutes, depending on if you are planning on cooking them additionally later, and how soft you want them to be. For me, 8 minutes was long enough to soften them up, but they still had a nice al dente bite to them. Let them cool, and peel away the waxy light green covering.

IMG_2052You end up with this beautiful bowl of favas. I like to keep things simple so that you can still taste them.

IMG_2054I tossed these with a lemon olive oil, lemon juice, lemon zest, fresh mint, and salt and pepper. At this point you can eat them as is, mash them up a bit to spread on toast, toss with pasta, you name it!

IMG_2055I added some cooked farro, and mixed the whole thing together for a satisfying side dish. This dish is good warm or cold.

Enjoy!

Fava Bean and Farro Salad

  • Servings: 4 as a side
  • Difficulty: Medium
  • Print

INGREDIENTS
1 bunch fava beans, approximately 16 pods
2 Tb lemon olive oil, or regular extra virgin olive oil will work well too
Zest of one lemon
Juice of half a lemon
1 cup cooked farro
2 Tb chopped mint
Salt and pepper

DIRECTIONS

Peel all of the fava beans out of their pods. Boil the beans for 7-10 minutes, let cool, and peel off the waxy coating. Toss shelled fava beans with olive oil, lemon juice, lemon zest, salt, pepper, mint and farro. Serve warm or cold.

Leave a comment

Filed under cooking, Recipes, Side Dishes, Vegetable

Belgian Waffles

IMG_2038One of our favorite weekend traditions is to have one sleep in day, with a fancy breakfast, home made lattes, and lounge on the couch for an episode of Scandal while we enjoy. A top contender for lazy Sunday breakfast is Belgian Waffles. Our favorite recipe is actually a make ahead yeasted waffle recipe from Ina Garten that I hope to share later, but alas we aren’t always that prepared. This past weekend we tried Emeril Lagasse’s recipe for Belgian Waffles and loved it. You separate the eggs and beat the whites, which really helps to make the batter light and fluffy. A few tips: melt your butter ahead of time and let it cool, and let the eggs and milk come to room temperature. This will help when adding the butter to your liquids if everything is closer to the same temperature.

IMG_2042What are some of your favorite lazy, loungey weekend breakfast recipes?

Belgian Waffles

  • Servings: 4
  • Difficulty: Medium
  • Print

Recipe from Emeril Lagasse

INGREDIENTS
2 cups cake flour
2 teaspoons baking powder
1/2 teaspoon salt
4 large eggs, separated
2 tablespoons sugar
1/2 teaspoon vanilla extract
4 tablespoons unsalted butter, melted
2 cups milk
non-stick cooking spray

DIRECTIONS
Preheat the waffle iron according to the manufacturer’s instructions. In 1 medium bowl sift together flour, baking powder, and salt. Set aside. In a second bowl use the wooden spoon to beat together the egg yolks and sugar until sugar is completely dissolved and eggs have turned a pale yellow. Add the vanilla extract, melted butter, and milk to the eggs and whisk to combine. Combine the liquid mixture with the flour mixture and whisk just until blended. Do not over mix. In third bowl, beat the egg whites with an electric mixer until soft peaks form, about 1 minute. Using the rubber spatula, gently fold the egg whites into the waffle batter. Do not overmix! Coat the waffle iron with non-stick cooking spray and pour enough batter in iron to just cover waffle grid. Close and cook as per manufacturer’s instructions until golden brown, about 2 to 3 minutes. Serve immediately.

2 Comments

Filed under Breakfast, cooking, Recipes